Every Student/Faculty/Staff member who has an account with EECS also has a home directory which resides on a replicated storage server. The amount of space which your home directory has is called your Quota.
Quotas
All accounts start with 3GB of space
Anyone may request a quota increase by emailing quota@eecs.tufts.edu with how much space they need and a brief description why.
Checking Your Quota
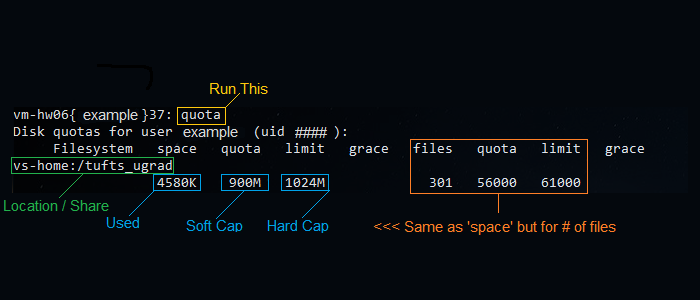
Anyone may check their quota from any of our Linux machines as seen below:
Accessing Your Home Directory
Your home directory is automatically mounted each time you logon to ANY of the Halligan-provided workstations or servers.
If you are not using a Halligan machine, or if your home directory fails to mount automatically, please see below:
Linux
You may mount your home directory on Linux by executing the following command, replacing username with your username, and localmountpoint with the local directory where you want your home directory to be mounted, and localusername and localgroup with the user and group on your Linux box that you want to have ownership of the directory. localmountpoint must be a directory that already exists in the local file system; mount will overlay that local directory with the network volume.
sudo mount -t cifs -o user=winusername,dom=hlgn,uid=localusername,
gid=localgroup,dir_mode=700,file_mode=600,sec=ntlmssp,version=3.0 //vs-home/winusername localmountpoint
Note that you must use your Windows (HLGN domain) password when prompted to authenticate, and that you will not be able to properly see or change file permissions. To set file permissions please connect to a login server (linux.eecs.tufts.edu).
Windows
If your computer is on the HLGN domain, and you are logging into a domain account (select Log into: HLGN when you login), you can simply go to the Z: drive to access your home directory.
Otherwise, it depends on which version of Windows you are using.
Click the Microsoft menu icon, then “Computer”. In the window that opens, just below the directory path bar, should be “Map network drive”. Click that. Choose a drive letter that you’re not already using, and enter “\\vs-home\username”. If you’re using a non-Halligan Windows machine, check the box next to “Connect using different credentials”. Checking this box will prompt you to enter your Halligan Windows username and password. Your username in this case must be HLGN\winusername.
Mac OS X
You may follow the directions for Linux, or you may use the Finder interface to mount your home directory.
To use the Finder:
- Method 1
- Make the Finder the active application.
- From the Go menu select Connect to Server… (or press select-K).
- In the Server Address field enter smb://vs-home/ and press Connect.
- Click Authenticate. In Workgroup or Domain enter HLGN, in Name enter your username, and enter your Windows (HLGN domain) password and click OK.
- From the drop down list select ~username and press OK to mount your home directory.
- Method 2
- Make the Finder the active application.
- From the Go menu select Connect to Server… (or press select-K).
- In the Server Address field enter smb://HLGN;username@vs-home.eecs.tufts.edu/username and press Connect.
- Replace username with your UTLN.
- Click Connect. Enter your Windows (HLGN domain) password and click OK.
- For more information, please refer to the following Apple article: Mac OS X: How to connect to Windows File Sharing (SMB)